
Development Process
Creating the Artwork
 Original
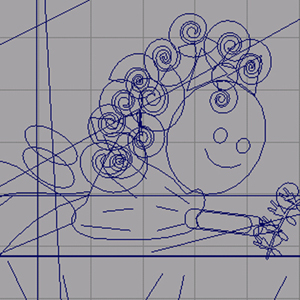
static drawings for backgrounds and characters were created in Adobe
Illustrator using sets of 2D enclosed curves. These curves were imported
into Maya as CV curves, and hand animated in using keyframe animation
of control vertices. Once the animation was complete, the artists use
a Maya plugin created by our team to specify how the animated curves
should be rendered as strips of paper.
Original
static drawings for backgrounds and characters were created in Adobe
Illustrator using sets of 2D enclosed curves. These curves were imported
into Maya as CV curves, and hand animated in using keyframe animation
of control vertices. Once the animation was complete, the artists use
a Maya plugin created by our team to specify how the animated curves
should be rendered as strips of paper.
For more on initial stages of the project, click here.
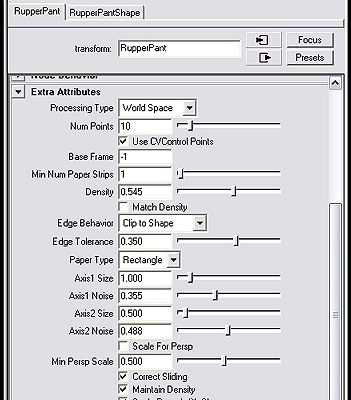
Artists are able to specify if a particular animated shape should be rendered using a polygonal approximation to the original shape, or a set of many simple pieces of paper that are placed to create the form of the original shape. The size, number, shape (rectangle, triangle, or hexagon), and density of the generated paper strips can be tweaked by the artist to create the intended look.
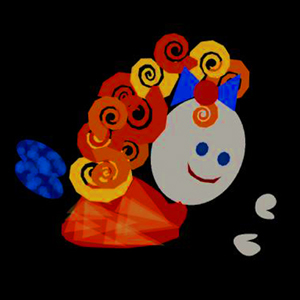
Once the Maya plugin generates the required geometry, the artists manually color the scene by assigning standard materials to the groups of pieces. To achieve color intensity noise in the renderings, and to create a feel of depth in the scene, the normals of the paper strip geometry are perturbed before final rendering. Lastly, the artists had to manually set the depth of the objects in the scene in order to ensure proper object visibility.
The Code
 The
artists work with a Maya plugin to turn the animated CV curves into
paper strips that represent the scene and characters. Parameters specified
on each curve specify how the associated paper should be generated and
placed by the code.
The
artists work with a Maya plugin to turn the animated CV curves into
paper strips that represent the scene and characters. Parameters specified
on each curve specify how the associated paper should be generated and
placed by the code.
Our code is able to generate paper strips randomly to represent a given shape, and then move the strips so that they maintain the form of the shape as the shape animates. Pieces move smoothly from frame to frame, avoiding the "popping" artifacts characteristic of other non photorealistic rendering techniques.
Generating Paper Strips
The animation of a shape is analyzed over a specified sequence of frames. The frame where the shape exhibits the largest area is chosen as the base frame. Our algorithm then proceeds as follows:
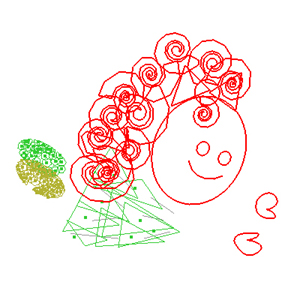
1. A set of random points (number specified by the artist) is selected within the shape, and paper strips are generated around these center points in accordance with artist defined parameters (see image to the right).
2. A second random sampling of points is chosen (several hundred) within the shape. For each point, it is determined if it lies within the boundary of an existing piece of paper. The results of these tests are used to obtain an approximation to how dense the paper covers the shape.
 3.
If the resulting density is less than what the artist has specified,
the code estimates how many more strips are needed to reach the desired
density (by computing density per added paper strip). It then returns
to step one to add that many new paper strips to the shape. And continue
to iterate, adding paper and testing coverage, until the desired density
is reached. Paper is never removed from the shape, but the algorithm
is careful to make conservative estimates not to overshoot.
3.
If the resulting density is less than what the artist has specified,
the code estimates how many more strips are needed to reach the desired
density (by computing density per added paper strip). It then returns
to step one to add that many new paper strips to the shape. And continue
to iterate, adding paper and testing coverage, until the desired density
is reached. Paper is never removed from the shape, but the algorithm
is careful to make conservative estimates not to overshoot.
Approximating Complex Shapes
Although desired coverage densities can be obtained, poor results were obtained when the paper strips did not closely approximate the outline of the shape. The coarse approximation made it difficult to distinguish areas of high curvature on the shape, and removed intricacies of the animation. In response to this problem, our code is able to clip edge polygons to the original outline of the shape, as well as abort the generation of paper strips that extend beyond the shape outline by a given amount.
Orienting the pieces of paper is an artistically pleasing way was also a challenge. As a solution, we had our artists specify a set of guidelines to give hints to the code regarding how paper should be oriented (Guidelines for the girl's dress are visible in the first image on this page). Without guidelines, the code uses the direction of nearby shape outline curves as guides to attempt to properly orient the strips of paper.
When paper generation is complete, the artist is able to preview the resulting paper strips quickly in an OpenGL viewer before creating the actual geometry in Maya. This allowed for a fast tweak-preview-tweak-preview process when generating paper for the shapes. In practice, it took the artists a significant amount of time to pick the correct set of paper parameters.
 Animating
the Shapes
Animating
the Shapes
In order to avoid visually unpleasing "popping" effects that would occur if a random splatting was performed each frame, paper is "splatted" down onto the shapes only in the BASE FRAME of a sequence. The movement of each of the vertices is then used to influence the movement of the center point of each shape. Curve vertices that are close to a piece of paper exert great influence on the movement of the piece of paper (Weights are proportional to inverse squared distance). Then, the change in position of a shape center point is given by the weighted sum of the changes in position of nearby curve vertices (position difference from the base frame).
The vertices of guidelines are influenced in a similar manner, so the orientation of paper pieces changes over time to match the change of the shape's outline.
Generating Paper Geometry in Maya
Once the entire paper generation process is complete, the sequence of 2D polygons must be imported back into Maya. Keyframes are set on each vertex over the entire original curve animation sequence at an artist controlled interval. Special features such as dissolves which were keyed in the original curve animation are preserved and correspond to setting keys along the appropriate animation curves (visibility in this case). Care was taken to optimize this in C++ to handle importing large sets of keyed polygons into Maya.
In order help with rendering quality a few automatic adjustments are made. Our rendering is performed with an orthographic camera, so each polygon must be randomly staggered along the Z-axis to avoid depth buffering artifacts that occur when two polygons overlap in the same plane. In addition, to add color variation, there is an option to perturb the normal of the polygons randomly (with a user defined threshold) to achieve some visible variability in the final rendered color of each paper piece.
Other Neat Effects
As work on the animation progressed, we added the ability to automatically scale shape size as a function of the shape's on screen Y position. This feature was used to provide perspective hints when papering large planar areas, such as the playground sand in the final scene.
The code is able to dissolve away a scene one piece of paper at a time, a feature that is used to transition between scenes in the piece.