The default view in Maya is a single perspective view. You can press the space bar to see 4 views. The top, front and side views are orthographic views.
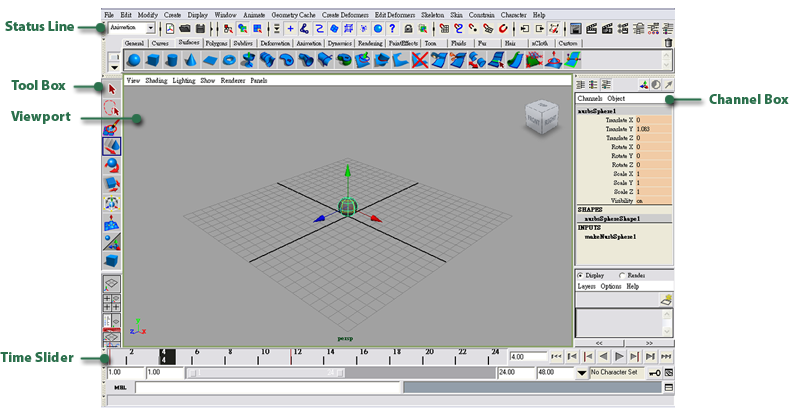
The tools you can use to change the position, size and rotation of objects are located on the Tool Box on the left side of the interface. You can press "w" to activate the Move Tool, "e" to activate the Rotate Tool and "r" to activate the Scale Tool.
The Channel Box on the right side of the interface shows the parameter of each channel. The background becomes orange to indicate that channel is keyed. If you want to adjust the parameter of one channel, you can select it first and drag in the view port with middle mouse button pressed.
You can click on the Time Slider at the bottom to go to a specific frame. Change the object attributes and press "s" to set a keyframe. The red lines indicate which frames are keyed.
For this project, you will mainly deal with the controllers of a rigged character. The character is already animated to do a walk cycle. You just have to adjust the animation to make it more expressive. You can single click on a controller to select it and use one of the tools to manipulate it to your desired state. To set a key, you can right click on the Channel Box, choose "Key Selected" to set a keyframe to your selected channel or "Key All" (or just press "s") to set a keyframe to all the channels.
There is also a Graph Editor you can use to adjust your animation. "Window"->"Animation Editors"->"Graph Editor". It provides you curves of how the attributes change in your animation. You can select and do middle-mouse drag to tweak your keyframes.

(1)The directory in where your rendered images are saved.
You must set your Project first .
( "File"- >" Project"- > "Set"... )
(2) Select file name.#(sequential number).extension.
(3) Choose a Camera to render your animation.
(4)Click the Maya Software tab to set rendering quality.
Start the Batch rendering in the Rendering Menu Set
"Render" ->"Batch render"
(You may need to change the Status Line in Maya interface to "Rendering" first.)
Fcheck:
You can use fcheck to view your rendered animation. Use "File"->"Open Animation" and select your first image.