Assignment 2: Inverse Kinematics
Due Date: Oct 13
Grade Value: 15%
Overview:
Your assignment is to implement two ways of doing inverse kinematics on a character's arm.
This is useful for posing a character. In our case, we ask that you pose the end point of
the right arm (the position at the end of the rfingers bone, id 29) to match pre-specified
target positions. We provide you with a similar motion viewer as in assignment 1. Since
we do not need to display motion here, you should use the pose.AMC file and ignore the
playback, rewind, and pause buttons. A file called IKtargets.txt (hardcoded name) contains
all the targets the end of rfingers should move to. These targets are loaded when you
load the motion file. The toggle targets button moves along the list of targets, highlighting
the current one by coloring it green. The intention is that when you press the run IK button,
the end of rfingers should move to the current green target. You can create additional
buttons for the two different IK schemes.
Requirements:
Your task is implement these two IK methods:
-
Cyclic-Coordinate Descent. See these articles
"Oh My God, I Inverted Kine!" and
"Making Kine More Flexible" for an
explanation of this method.
-
Compute the pseudoinverse of the Jacobian, and use this to compute the joint angles
needed to pose the character's arm. See Rick Parent's "Computer Animation" book,
Section 4.2.4, for details about this method.
You can change the joint angles starting from the joint in between the rclavicle (24)
and rhumerus (25) bones. Everything below this in the skeleton hierarchy can also
be changed. You can change the target points by changing the IKtargets.txt file.
We will be testing your code on different target points.
Hand
in :
- Your code and documentation of how to run it.
- A comparison/discussion of the two techniques.
Source Code:
The starting source code for the assignment is at /afs/cs.cmu.edu/academic/class/15464-f05/asst2/src_viewer_IK/
You may have to do the following to get the code running:
setenv LD_LIBRARY_PATH /afs/cs/academic/class/15464-f05/lib/
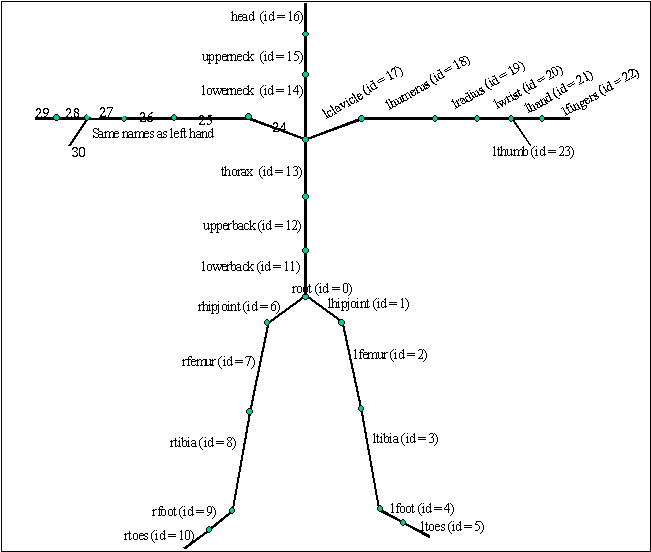
Here is the skeleton hierarchy. The one in assignment 1 has a small error in it.
Source code structure and description:
The code in the "src_viewer_IK" directory is similar to the code in
assignment 1. Here is a description of the files:
-
Skeleton class: read an ASF file and build the skeleton
hierarchy. See the description of member function and member variable in
"skeleton.h" file. When the skeleton is read the following hierarchy of
bones is constructed: Each node in the hierarchy represents a bone segment
as shown in the diagram above. Each bone has exactly one child. If in skeleton
file (.ASF) a particular bone has more than one child (like root for example)
the second child is set as a sibling of the first child, the next child
as a sibling of a previous child and so on.
-
Motion class: read/write an AMC file and store joint
angles for each frame in the m_pPostures array. Each posture defines the
root position and orientations for all bones at a particular frame. For
more details see "motion.h" file.
-
Display class: draw the actor at a given posture.
-
Player.cxx: player function handling (user interface functions),
render setting (OpenGL initialization, light and camera settings)
-
Tansform.cxx: some math functions for transformation.
There was an empty Matrix class here from an old version of the code.
You can use the matrix class provided.
-
Vector class: 3d vector representation and operations (addition,
subtraction, ....). See "vector.h" file for the full description.
-
IK class: You can write your code here. There are examples of how
to access information that you will need. See the examples in IK.cxx for
more details.
-
matrix class, nrutil.c, pythag.c, svdcmp.c: class to handle matrices
of any size. Handles memory management. Has code for computing a matrix transpose,
multiply, and pseudoinverse. The other .c files have functions used in the inverse matrix
function.
Debugging:
If you enter -2 in the joint box, you will see a dark grey sphere drawn at the end of the rhand bone,
and red, green, and blue spheres drawn to represent the vectors in the local axes.
The code that does this is in the redisplay() method in player.cxx.
Similarly, you can draw spheres in the environment for debugging if necessary.
If you print out these values, they will make no sense. This is because
the whole environment is transformed if you move the camera. And so these
values get transformed too. You should not have to worry about this. Just
remember that the values are consistent with each other.
Extra Credit:
Here are some ideas for extra credit.
-
Different weights for different joints:
You can weigh the joints differently so certain ones can be preferred over others.
Discuss how to achieve desired poses this way.
-
Multiple targets at once:
For example, you can match both the end of the rfingers bone to a target point, and
the end of the rhand bone to another target point.
-
Interactive interface:
Create a click-and-drag environment so the user can drag the target points. The
character's pose updates continuously to match the targets.
-
Optimization:
Compute an optimal pose. For example, you can minimize the sum of the squared change
in joint angle (compared to starting pose).
-
Anything else that makes posing the character more intuitive!
Last Modified: 09/20/05