15-462, Computer Graphics Spring 2004
Programming assignment 4 - Texture Synthesis
Introduction
This is your last programming assignment and it should be a lot of fun. It is a bit different from your other assignments (and the historic scope of this class) in that it concerns an "image-based" research area. You can throw away your OpenGL reference books. Your textbook briefly mentions image-based rendering in section 13.8, but it doesn't cover what you'll be doing here: texture synthesis.
First, a simple definition of texture synthesis from Ashikhmin 2001
"a texture synthesis method starts from a sample image and attempts to
produce a texture with a  visual appearance similar to that sample."
Texture synthesis is a very active research area in graphics. It's also a relatively new research area. Its roots might be traced back to the 80's, but the "seminal paper", Heeger and Bergen 1995 is less than a decade old. In my opinion, however, the seminal papers are really Efros and Leung 1999 and Wei and Levoy 2000. These (very similar) methods are elegant, easy to implement, and work better than anything before them. This is the class of algorithm you will be asked to implement. I will refer to these methods as "neighborhood-based" methods. Here's a short description of the algorithms, then we'll explore all of the variations, uses, and details.
Procedure
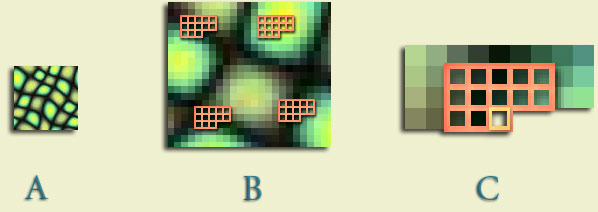
A is our input texture. It's a nice texture, but we want more of it. So how do we do this? We could try just tiling it over and over again, but even for periodic textures this can produce visual artifacts. And in general, textures might not tile at all. We want a general method for seamlessly making an arbitrary amount of texture.We create a data structure called "textons" which we assume are the base units that make up a texture. B shows four of these textons. The texton simply stores the center pixel color and the color distribution around it. We can create a texton from each (non-edge) pixel in the input texture. (Or you could assume the edges of the image are mirrored and define the edge textons that way. Or you could find some way to use partial textons.) We're treating each little image window as an example of valid texture element.

So now we have some data structure containing lots of example textons. This is a memory based learning technique. We have "learned" the input texture by assuming every texton in the input image is a valid output of whatever process generated this texture. Each texton can be thought of as a vector of size equal to the number of pixels in the neighborhood times the number of color channels (12 * 3 in our case). Similarly each vector could represent a point in some very high dimensional space. Different papers will approach textons differently so remember these things are all equivalent.
Why is this neighborhood-based concept of textons useful? Because it encodes the spatial relationship between colors that are important for preserving the structure of the texture.
But, we're still missing an ingredient before we start synthesizing texture. We need a distance metric. We need to be able to quantitatively express how far apart any two textons are. Why? What if our textons are as pictured in B. We want to try laying down pixels to synthesize a new texture, and we stumble upon the situation shown in C. We have some amount of texture that we've already synthesized, and we just need to decide what the next pixel should be. How do we do this? We find the texton in B that is the closest to our current situation. We take the center pixel of that texton and copy its color into the texture we're synthesizing. Then we slide over and repeat until we have as much texture as we want.
Your distance metric could be a lot of things. The simplest thing would be SSD- Sum the squared difference between each corresponding texton element. This actually works reasonably well. However, you might want to give the pixels near the center of the texton more weight. They are probably more important in finding a well matched texton. People do this by weighting the textons with a Gaussian kernel, which is a fancy way of saying that the farther the pixel is from the center of the texton, the less it should contribute to the distance metric. One could also treat the color channels unequally in a distance metric. It would be reasonable to weight green more than red, and red more than blue, since humans have unequal sensitivity to R, G, and B.
Now you can also see why those neighborhoods have a funny shape- it's a side effect of a synthesis algorithm. We didn't bother to keep track of the pixels to the right or below the current pixel because we're going to synthesize in scanline order. We know that the only pixels we'll have synthesized are above and to the left of our current location, so those are the only pixels we should use to decide the next pixel color. This is the approach used in Wei and Levoy 2000. Efros and leung 1999 use a more general method that normalizes the distance metric over any already synthesized pixels, but it is not well suited for optimization.

By using these 5 width textons, we (partially) conserve the spatial coherency of the input texture when creating our new texture. In reality, we only conserve the coherency of texture elements that are smaller than 5 pixels. The above figure shows synthesis results from Wei and Levoy 2000 using varied neighborhood sizes. The smaller the neighborhood, the less spatial information each texton encodes. Your synthesis algorithm is blind to larger scale mistakes it may be making. Unfortunately the neighborhood size necessary to faithfully synthesize a texture varies from texture to texture. It also becomes computationally troublesome to use large neighborhoods- the Big O of this type of synthesis algorithm (without optimization) is O((neighborhood width * neighborhood height) * (input width * input height) * (output width * input height))
Unfortunately this only establishes a baseline texture synthesis algorithm. Considerable improvements result from using multiresolution neighborhoods and acceleration as in Wei and Levoy 2000. You can consult the paper for the details, but I'll give a brief, high-level description of both.
Multiresolution neighborhoods are a way to faithfully reproduce large scale texture elements without having to use a giant neighborhood. A 40x40 neighborhood would be 64 times slower than a 5x5 neighborhood, for instance. A better way to deal with large scale texture structures is to operate at multiple resolutions. For instance, reduce the size of your input and output to 16 pixels by 16 pixels, then synthesize your output. That captured the large scale elements, right? Now expand them both to 32 by 32 and use your 16x16 synthesis output as a starting point. Continue until you're back at the original resolution. In actuality, the algorithms accomplish this not by having pixels from two different image resolutions in the neighborhood at the same time using an image pyramid.
Acceleration refers to several possibilities. In Wei and Levoy 2000, Tree Structured Vector Quantization is used. This sounds confusing but it's really quite simple. Instead of storing all of the input textons in a list that must be brute-force searched every time you want to synthesize a pixel, they create a data structure which instead returns an approximate best match in exchange for being much faster. It's just rounding. Here's a good page that explains Vector Quantization. Another approach is to run PCA on the textons (or rather, their equivalent representation as points in a high dimensional space). PCA basically finds the axes in this high dimensional space along which there is the most variance. By projecting high dimensional points on to this reduced set of bases, you can get by with a smaller coordinate system.
Here are the types of texture synthesis results you can expect from your texture synthesis algorithm.
That page also shows results for "gap-filling" in which texture from one part of an image is found to replace another part. In the case shown it's just a gap, but you can use algorithms like this to remove image elements very seamlessly. It's a bit like an intelligent clone tool in photoshop.
Applications and Extensions
Texture synthesis has a lot of uses. The obvious one, of course, is given in the definition: Making more texture. This is good for texturing 3d environments, characters, etc. I expect to see simple texture synthesis algorithms being programmed on graphics hardware in the near future.Researchers have stumbled upon many more uses for texture synthesis algorithms. Ashikhmin 2001, a clever extension to neighborhood-based algorithms, does "targetted" texture synthesis (see bottom half of page), in which the synthesis algorithm basically becomes a competition between trying to resemble one input image and trying to use the texture of another input image. Image Analogies extended Ashikhmin in to an analogy framework which can be used to do all sorts of neat things.
Texture synthesis algorithms typically scale to higher dimensions, as well. This means that instead of just operating in two dimensions for an image, it can operate in three dimensions to synthesize movies. You can think of movies as a 3d texture, containing x and y dimensions like an image but with the addition of a time dimension. The texture synthesis algorithm you're programming also scales easily to 3d (though the naive results are generally poor).
Texture synthesis can be done directly onto 3d surface to avoid all of the tricky issues of fitting a planar texture on to an arbitrarily shaped polygon. (Turk 2001, Wei and Levoy 2001).
Graph Cuts, Kwatra et. al. 2003. shows examples of using texture synthesis to merge multiple images seamlessly. The synthesis algorithm can also imitate perspective effects or mirror and rotate textures in order to create less repetitive results. Graph Cuts is probably the best general texture synthesis algorithm right now.
Your Assignment, due 11:59pm, Tuesday December 7
70 points total - You must implement a texture synthesis algorithm meeting the following baseline requirements10 points - Quality of results
10 points - You must make a really cool movie
Extensions (some of these are fairly involved). For each of these that you choose to do, add a paragraph to your readme file explaining how exactly you added each extension. Also you should include a directory of before and after results for each extension you add.
Full credit is 100. With extra credit, max score is 120.
Notes and Tips
Some Test Images
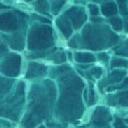
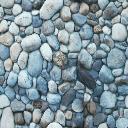
Here are some images you may use for your test. Please do find some other cool images for your result.


